Quilting is a craft that combines creativity, patience, and precision to create something both beautiful and functional. Among the many designs that quilters enjoy making, the interwoven quilt pattern stands out for its striking visual effect and intricate yet achievable layout. A free interwoven quilt pattern offers crafters the opportunity to experiment with shapes, colors, and textures without needing to invest in expensive templates. This type of design mimics the look of woven fabric, giving the quilt a dynamic and layered appearance. Whether you are a beginner looking for a new project or an experienced quilter searching for inspiration, the interwoven quilt pattern provides endless possibilities for artistic expression.
What is an Interwoven Quilt Pattern?
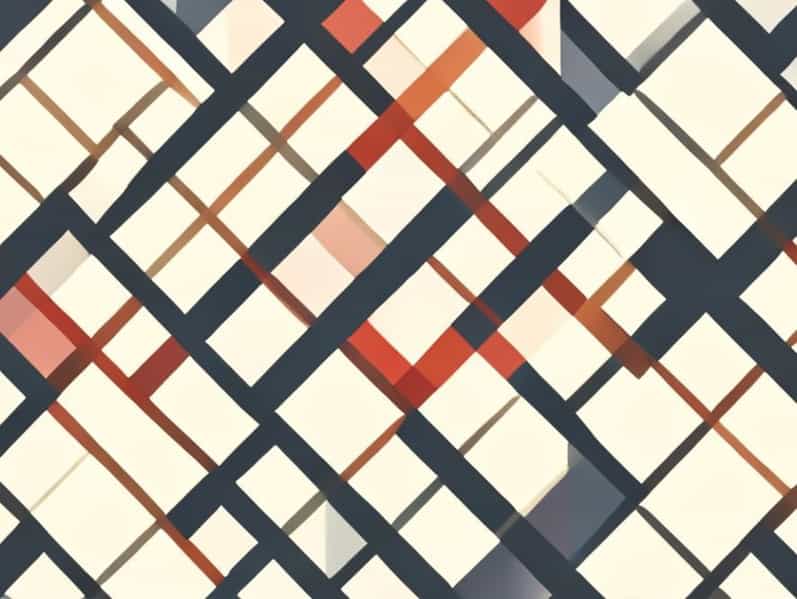
An interwoven quilt pattern is a design that creates the illusion of fabric strips weaving over and under one another. The arrangement of these strips produces a beautiful, three-dimensional effect, making the quilt look complex even though the underlying construction can be quite straightforward. These quilts are often based on repeating blocks or continuous strip piecing, allowing quilters to achieve symmetry and balance throughout the design.
Why Choose an Interwoven Pattern?
The interwoven pattern appeals to many quilters for several reasons. First, it provides visual interest through its geometric composition and interplay of light and dark fabrics. Second, it can be easily adapted to different skill levels, from simple beginner layouts to more advanced designs featuring intricate intersections. Finally, an interwoven quilt pattern can be customized with color gradients, themed fabrics, or even scrap materials, making it a versatile choice for any quilting style.
Materials Needed
To start creating your own quilt using a free interwoven quilt pattern, you will need a few essential materials. Choosing the right fabrics and tools will ensure your finished quilt looks professional and lasts for years.
- Assorted fabric strips or fat quarters in coordinating colors
- Cutting mat, rotary cutter, and quilting ruler
- Thread that complements your fabric
- Sewing machine or hand-sewing tools
- Batting and quilt backing fabric
- Pins or clips to hold fabric in place
- Iron and ironing board for pressing seams
Choosing Fabric Colors
Color choice plays a significant role in how your interwoven pattern will appear. Using contrasting tones enhances the illusion of depth and weaving. For example, alternating light and dark fabrics can create a dramatic woven effect. You can also use a monochromatic color palette for a subtle, sophisticated look, or mix bold patterns for a more playful and eclectic finish. The goal is to create balance and movement across the quilt.
Basic Steps for Making an Interwoven Quilt
Although the interwoven design looks complex, it can be broken down into manageable steps. Here’s a simple guide to creating your own version of this timeless quilt pattern
Step 1 Cutting the Fabric
Start by cutting fabric strips of equal width commonly between 2.5 and 3 inches wide. The length will depend on the overall size of your quilt. Accuracy is important here, as consistent strip width ensures clean intersections and an even weave pattern. It helps to use a rotary cutter and ruler for precision.
Step 2 Arranging the Strips
Lay out your strips on a flat surface or design wall to visualize the interwoven layout. Alternate the direction of strips so that some appear to go over while others go under. This creates the woven illusion. Play with the color arrangement until you achieve the desired balance. Taking a photo of your layout before sewing can be helpful as a reference.
Step 3 Sewing the Strips
Once you are satisfied with the arrangement, start sewing the strips together in rows. Press seams open or to one side after each row to keep the quilt top flat. After completing all rows, join them together to complete the woven design. The intersections will begin to form naturally as you align each strip section.
Step 4 Adding the Border and Backing
After finishing the main quilt top, you can add a border to frame the design. Borders help enhance the interwoven effect by containing the movement of the pattern. Cut border strips, sew them around the edges, and press carefully. Next, prepare your backing fabric and batting, ensuring they are slightly larger than the quilt top.
Step 5 Quilting and Finishing
Layer the quilt top, batting, and backing, then baste them together using safety pins or temporary adhesive. For quilting, you can use straight-line stitching to complement the geometric look or free-motion quilting for a more textured finish. Once quilting is complete, trim excess fabric and bind the edges to finish your interwoven quilt.
Creative Variations of the Interwoven Quilt Pattern
The beauty of a free interwoven quilt pattern lies in its adaptability. Quilters can modify block sizes, colors, and arrangements to suit their preferences. Some creative variations include
- Diagonal WeaveInstead of straight horizontal and vertical strips, angle them diagonally for a dynamic, modern look.
- Scrappy WeaveUse leftover fabric scraps to create a colorful, patchwork-style design with an interwoven structure.
- Ombre EffectGradually transition fabric shades from light to dark to enhance the illusion of depth and movement.
- Mini QuiltsCreate smaller versions for wall hangings, table runners, or pillows using the same interwoven concept.
Tips for Beginners
If you are new to quilting, an interwoven quilt pattern can be an excellent way to practice accuracy and color coordination. Here are a few tips to make the process smoother
- Start with a small project to understand how the pattern flows before attempting a full-size quilt.
- Use pre-cut fabric strips, such as jelly rolls, to save time and ensure uniformity.
- Label your strips or sections during layout to avoid confusion during sewing.
- Press seams carefully and consistently to maintain a professional appearance.
Why a Free Pattern is Worth Trying
Using a free interwoven quilt pattern allows you to explore this beautiful design without financial barriers. Many free patterns are beginner-friendly and include step-by-step instructions. They can also serve as a foundation for creating your own custom variations. Working with a free pattern encourages experimentation, helping quilters develop their skills while producing something visually striking and functional.
The Joy of Handmade Quilts
Beyond the technical aspects, quilting is about creativity, connection, and storytelling. Each piece of fabric and stitch represents time, patience, and personal expression. An interwoven quilt pattern, with its overlapping design, can symbolize relationships, memories, and the interconnectedness of life. Completing a quilt brings a deep sense of accomplishment, whether you gift it to someone special or keep it as a personal treasure.
A free interwoven quilt pattern offers both artistic challenge and rewarding results. Its intricate yet approachable design makes it suitable for all skill levels, allowing quilters to play with colors, textures, and layouts. With patience and creativity, anyone can craft a quilt that captures the elegance of woven fabric and the warmth of handmade craftsmanship. Whether you’re sewing for relaxation, decoration, or gifting, the interwoven pattern remains a timeless choice that continues to inspire quilters around the world.